New updates for: M4A1 Sherman, Panzer III and Panzer IV - April 22, 2023
Hello everyone. It's me Antony, back with another blog in 2023.
I know. I slowed down the activities on Blogspot again due to my studies. Yup, the civil service exam I mentioned in my previous Blog - scheduled on May of 7th of this year. I paid my subscription in case I'd try, again. If I fail, it would be another civil service performed, with my money being spent for nothing.
I'm still waiting to be called to work at the public health center by the selective process exam for the attendant vacancy. They called the candidate of number 32 and I'm number 33 in the approved candidates list. Others that had been called gave up, with some of them being from other cities, while others are working or other situations they couldn't be fit. At least this is good because it will speed up the calling to reach me. And I'm still waiting to be called to work as a teacher by the Government's selective process I assigned for a while. Both are great in case I'd receive some payment for my services and skills. Until then, let's wait.
Putting my personal news aside, let's go to the important thing here in this Blog. For today, I'm going to show you the new images of the M4A1 Sherman, Panzer III Ausf. J1 and Panzer IV Ausf. F2(G).
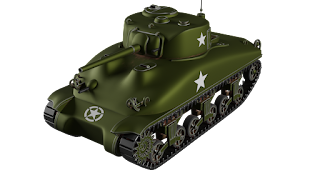
M4A1 Sherman:
I added more lamps in the forward section as I noticed there are two; more rings, a new sight on the cupola's hatch, a new hatch on the turret's left side, new fuel tank ports and more 'holding bars'. Minor adjustments were the suspension system and the chassis - especially some cylinders located next to the engine access doors.
The hatch was a bit tricky to make while following the drawings. Fortunately I did my best to make it. So far, it looks good.
Next components are: the tools, the .50 caliber Browning M2HB machine gun, a small adjustment on the turret, the chassis and the suspension system. After that, a nice texture and rigging this American tank.
Panzer III Ausf. J1:
For the Panzer III J1, I added some hatches on the chassis and some extra components on it (presumably it is the access plates to the transmission). Also, I added some metal links to the rear wheel, two metal cases and some locking pins for each top plate that protects the tracks and suspension.
Minor changes were made on the storage box, the lower wheels, the commander's cupola, the chassis and antenna resting case. After my last Blog where I talk about the changes on the tracks (Civil service exam and new updates for: M3 Half-Track - April 17, 2023), I had to adjust it and the wheels' position for getting them a bit distant from the chassis.
Next components are: the lights (I plan to add them after concluding the Panzer I), the rework on the rear section of the middle chassis, concluding the rear wheel shaft, adding the towing hooks and the spare tracks' base. Then I'll texture it and rig it.
Panzer IV Ausf. F2(G):
The Panzer IV received some minor changes on the commander's cupola, the forward wheel and the storage box. The driver's hatches had its Bevel modifier removed. Like in the Panzer III, I added some locking pins on the top plate that protects the tracks and wheels.
Another thing I added was a lift jack. I finally found out the name for that 'hand crank device' located on the Panzer I after my brother saying it resembled a car's jack for lifting in order to change wheels and tires, but it's not hydraulic as far he understood it.
For the Panzer IV, I had to import the jack from the Panzer I with some adjustments to fit in the blueprints. Then I decided to append it to the Panzer III.
 |
| Panzer III's jack |
 |
| Panzer III's jack |
Both German tanks are looking nice.
Other components to include are other working tools like shovels, crowbars, a minor rework on the forward lights, a good painting and rigging the tank. I'm not sure I plan to make minor adjustments to make some deformed plates after battle.
One final thing: The Schürzen space armor were made for both tanks. However, they are still in development as I need to change some things for the Panzer III and Panzer IV.
Panzer III Ausf. N:
Panzer IV Ausf. J:
Alright. The Panzer III and the Panzer IV looks nice with these Schürzen armor. Although they lack the links to connect with the turret and the chassis, I think it would make these two German tanks quite armored.
The changes I must do is adjusting the turret Schürzen from the Panzer III to give some room for the antenna while the one for the Panzer IV must be relocated on its rear section at the left side. Only the commanding tanks of the J model shall receive more antennas around the tank. Also, the gas canister launchers and the external MG34 / MG42 must be included as well; and a new model for the Panzer III's engine exhaustion outlet.
Well, that's it for now my friends. I hope you enjoy this Blog. In case I have some spare time to enjoy, I'll be working on other things aside from Blender projects and my personal things. Until the time comes, you will be surprised to see them. See you next time.
My DeviantArt:
My second Youtube channel:
My other Blogspot places:
My Facebook page:
My Instagram:
My ArtStation:
Note: Don't you dare to download these images and re-share it without my permission. If you do, please, leave the original author name.


%20test%20141.png)
%20test%20142.png)
%20test%20143.png)
%20test%20144.png)
%20test%20145.png)
%20test%20146.png)
%20test%20147.png)
%20test%20148.png)


Comments
Post a Comment