Junkers Ju 87 Stuka (3D printed model) - November 17, 2022
Hello everyone. It's me Antony, back with another blog in 2022. We are now on November 17 - approaching the end of 2022; hoping for the things to get better. Now that I'm working and studying, my time for Blogs decreased to some occasions and some weekends.
For this month and for December, I will focus my attention on my university semester and the new weekly tasks and my job (which are quite stressful but I'm used to. Haha. After that, I think I'll take a break from university and public exams as soon as I settle down for good). I'm not sure what will happen after December 31 - if the mayor, the administrative director and my employer can extend my contract at the public health center further or it will officially end. At least I can rest after that and find other thing to do for a living.
Alright. With nothing else to add, let's go for the Blog. For today, I'm going to bring new images of the Stuka - my first 3D printed model I mentioned in my last two Blogs (New updates for: Hurricane Mk I and Stuka (my first 3D printed model) - September 30, 2022 / New updates for: Panzer IV, new photos of Stuka (3D printed model) and change of TonyLiteraryWorks name - November 1st, 2022). For every photo I'm going to tell you the events and other things related to its development. Let's get started.
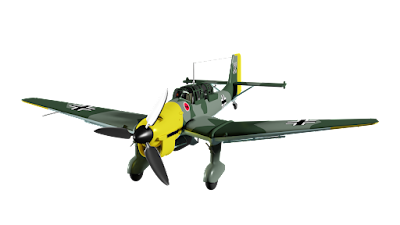
The model selected for the Stuka was the Ju 87 B-2. While I was talking to my cousin after I concluded the model on Blender, he requested if I could print it based on Hans-Ulrich Rudel's aircraft. In case you ask me, Rudel was a German Stuka ace during World War 2. He was one of the few German combatants to receive the Knight's Cross with Golden Oak Leaves, Swords, and Diamonds. He was credited with the destruction of 519 tanks, one battleship (the Soviet Marat), one cruiser, 70 landing craft and 150 artillery emplacements; claiming 51 aerial victories and the destruction of more than 800 vehicles. He flew 2,530 ground-attack missions exclusively on the Eastern Front until his surrender to the Americans in 1945. After the war, he emigrated to Argentina by ratlines - used by fugitives to escape from Germany and Italy to several countries, especially in South America; where he became a close friend to the Argentine president Juan Perón and Paraguay's dictator Alfredo Stroessner. On Argentina, Rudel created a ratline to refuge Nazi party and SS members like Josef Mengele - the doctor who conducted horrifying experiments on Auschwitz. As he returned to West Germany, he was involved in controversial scandals due to his political alignment and beliefs.
Although his remarkable Stuka was the G-1 Kanonenvogel model - known for its twin 37 mm Bordkanone cannons for destroying tanks, heavy armored vehicles and fortifications, I managed to find some photos and images of his Stuka in his B-2 model.
In order to make the Stuka printable, I had to save it in other file and prepare the plane to be compatible for CURA - the main software my brother and I use to convert 3D models to printable format the 3D printer can read and print. To prepare it, we separated the plane in several components like the fuselage, wings, landing gear carriage, flight control components (ailerons, flaps, rudder and elevator), propeller blades, spinner, the bomb and the smaller components like the non-retractable landing gear, antenna, MG 15 barrel, dive flaps, the flaps and ailerons metal links, elevator balance mass and step-in components. Then my brother and I started printing the plane.
The initial photos of my first 3D printed model coming out of Blender to the real world. The Junkers Ju 87 Stuka.
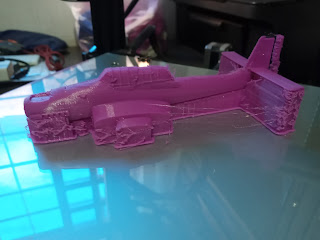
The first component to be printed: the fuselage.
Next: the wings.
Next: the propeller blades, the spinner and the landing gear. One of the wheels didn't came out properly and the blades came out too thin. For that, I had to rework the blades on Blender and CURA. My brother helped me with the blades' rework and reprint.
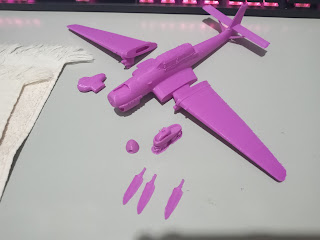
New components printed: the ailerons, the flaps, the elevator, the bomb, elevator balance mass, the rudder, the dive flaps and the propeller blades were reprinted after the readjustment.
The smaller components were also printed for the Stuka. Due to the size we gave it, most of the smaller components came out too small and difficult to work due its thin structure.
After printing all the pieces, it was time to prepare the plane's wings to be mounted to the fuselage, by sanding its surface and using a soldering iron for tinning electronic components. Noticing the assembly pieces being too big and the spacing too small, the only way was sanding it and treating up the plastic with soldering iron and a box cutter.
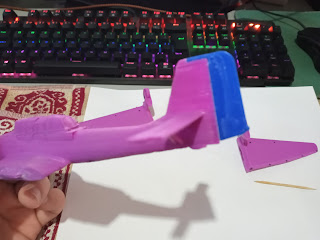
While I was working on the fitting parts in order to fit the wings into the fuselage, I accidentally broke the tail rudder; and I almost broke one of the bomb's arms. Fortunately my brother glued it to fix it.
We had to reprint the rudder after the previous model broke. Also, the smaller components were reprinted with a new size. In the meantime, the landing gear and the wings are looking nice after I used a sandpaper, soldering iron for tin and a box cutter.
And now, here's the fun part: gluing the pieces together - starting by the landing gear to the wings and the rudder to the fuselage.
After that, I glued the wings to the fuselage and one of the blades to the spinner.
The other blades were glued to the spinner.
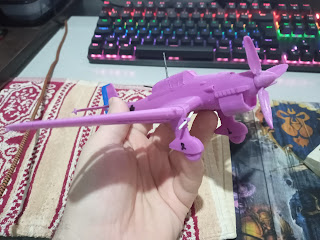
The Stuka is almost ready. A few more components and then I proceed to the treatment and finishing phase.
The Stuka is almost ready. A few more components and then I proceed to the treatment and finishing phase.
The elevator balance mass were the nasty part to glue as it was too small to catch and attach it to the elevator while soaked in glue (precisely the super glue).
Some small pieces had to be replaced by wire, like the antenna, the MG 15 barrel, the Jericho Trumpet blades, the pilot step-in stairs and the bomb guiding component. The non-retractable landing gear was the only printed piece that fit well - with a small adjustment as one small part of the wheel was not printed well and my brother and I used another one to complete it.
Also, the dive flaps were also glued to the plane's wings.
The Stuka is looking good. Only the bomb remains to be glued to the plane, but we will do that after painting it and the Stuka. Speaking of the bomb, the printed 'arms' had to be replaced by wire after one of them breaking again.
The Stuka is looking good. I My brother helped me with a hairdryer to fix the propeller blades as they were aligned a bit forward like a flower. I put a putty on it to fix some irregularities that came from the printing and spacing after the pieces were glued together. However, while I was using the sandpaper to remove the excess, I broke one of the propeller blades, twice. For that, I had to glue it again. Then I almost I broke the right wing after resuming the sanding process. After the sanding, I used a primer spray in order to prepare the Stuka for painting.
Initially I used a chrome spray paint - giving the plane a silver / aluminum appearance. Just for fun: if this plane would be the P-51D Mustang, the chrome spray paint would be perfect. The bomb also received the primer, but some pieces would be painted since it would be black or dark gray.
I noticed the lower section of the plane has a primer excess - especially the middle section from where the wings connect with the fuselage. I'll sand it along the wings and elevator in order to put more putty.
After sanding the Stuka and putting some Primer again, now it's time for painting it. Previously, while I was sanding to remove the Primer excess, I accidentally sanded the tail-horizontal tips too much. I've tried putting some superglue on it, but it won't stay put. Still, let's keep going. I tried mixing a sky blue with a yellow sand to make a light blue color next to the original RLM 65 Hellblau (light blue in German) for the plane and Black with a light gray for a dark gray color for the bomb and the propeller blades. The wheels were painted in black.
After painting the Stuka with several layers of light blue, I tried to mix some inks in order to get a grayish-green color. However, I got a green-avocado instead - which would be good for Soviet planes like the Yak-1, MiG-3, LaGG-3, Pe-2, Pe-3 and the IL-2.
My beautiful Stuka - in the palm of my hand.
After that, I finally got the closest thing to a RLM 71 Dunkelgrün (dark green in German) color. I had to paint the upper section in that color while leaving the lower section in light blue - with few sections painted in black, silver and dark silver.
Mixing again the colors to get a dark green (or as the Germans would prefer: Schwarzgrün - black green). I painted some areas I marked with a CD pen. I noticed the canopy has a thick layer of paint - making it difficult to separate the glass are from the metal framing for painting; which can be solved by using a brush with water. Also, while I left the Stuka to dry outside, I found out it 'flew' after the wind blew the paper I used to make it and the plane few with its nose pointed to the ground, breaking two propeller blades. I guess after that I'll have to leave it inside of a bucket in case I'd leave it outside again or just leave it inside a room with sunlight. The grayish painted areas were painted with a little of dark green.
The Stuka is great. All I need is to use the hair dryer to fix the propeller blades and the rudder. I noticed he got a little scruffy.
The wing carriage has also been painted in black-green to match the aircraft's original paintwork per the assembly instruction illustrations.
Some areas have a little bit of paint that ran out while I was painting the top section. I'll correct that little detail later.
Back again with another painting time. Yesterday I painted the cockpit metal frames with another Schwarzgrün paint mixture - using a toothpick instead of a paintbrush; while the glass had to be painted with a mix of white and light blue. I tried to darken the Dunkelgrün painted areas on the wings and elevator. Now the Stuka is nearly finished. The bomb had to repainted in dark-silver - also by a toothpick with few occasions by a paintbrush.
The propeller blades were also painted in dark-silver along the spinner - using some masking tapes to cover the areas I didn't want to paint. The white markings on the blade were my attempt of making the Junkers logo, but it came out pretty nice. Also, I used a toilet paper to create some effect on the blade along a toothpick.
The Stuka is nearly finished. I used a black matte paint for the gun smoke and the engine smoke from the outlets on the upper section of the wing and the plane's nose. All that is left is remove some paint from the miss-placement on the cockpit and under the wings; or maybe create some oil effect or dust; and a yellow layer on the wing tips and tail fuselage.
The Stuka's 550 lb bomb. It's looking good. My brother recommended me to use varnish before gluing it on the Stuka's belly.
The Stuka has been painted one more time - now with layers of yellow. I used some masking tapes to select the desired area in the fuselage and the underside of the wings. The wheels were painted in matte black, but I plan to give some dust / sand effect on its surface. The navigation lights were also painted on the wings tip.
I also gave some gun smoke on the underside of the wings. The plane is looking good.
The Stuka on its final version. I applied the bomb and the decals on the plane and a nylon string glued on its rudder, linking to its antenna.
One final thing: On my Facebook page and Instagram, I had to censor some of the photos of the Stuka with the decals - especially those with the original German Luftwaffe fin flash. Most German planes had a Hakenkreuz (Swastika) painted on its rudder as a symbol of the German Reich, and due to the restrictions / laws that forbid / mark the Hakenkreuz as a questionable / negative symbol, some artists censor it or simply don't add it to their build-up kit planes. But, as my cousin ordered me a Stuka with the original symbols, I included the non-censored version of it. For this Blog, I may upload the uncensored version of it.
I kinda noticed the yellow layer could be a little bit closer to the canopy instead in between the rudder and the MG 15 barrel. Probably for the new printed replica I may do it correctly.
I just think the right roundel was glued a bit too closer to the wing tip instead of the Pitot tube.
The underside of the wings also received the Luftwaffe roundels. When I was going to apply the decals, I had to resize the roundels, the fin flash, the numbers and letters for the fuselage and the underside of the wings as the initial decals were too big. On the second attempt, I got the ideal measure for it.
All the hard work has finally paid off - from printing it by pieces, assembly, the sanding and putty for fixing the gaps, the Primer, painting the plane, the varnish and now the decals.
For fun, I decided to take some shots with the German Iron Cross and some satin ribbons in the colors of the Imperial German Flag for the medal. It's not going to be included for the ordered Stuka.
And here I am behind the Stuka for the last photos before I present it to my cousin.
In case you ask me, the colors used for the Stuka were fabric dyes. Although it may work well in plastic, they were the only colors available for painting the aircraft. There was one in particular that suits for PVA - matte black color ink.
For the yellow stripe on the fuselage and the tips of the underside of the wings, I used a Yellow Gold - the closest thing for the RLM 04 Gelb (yellow in German).
For the RLM 65 Hellblau (light blue), I used a mix of White, Caribbean Blue and Sky Blue. The initial mixes were simply White and Sky Blue, but I included the Caribbean Blue after painting the glass surface from the canopy and to reuse the mix before it could dry out to be discarded. I had to mix well the colors for better results. Some times I mix a little of water in order to avoid the ink to dry.
For the Dark Silver color mixture to paint the bomb's surface and the propeller blades, I used Silver and Black dyes. I had to use more Black than Silver, otherwise I wouldn't have the desired color.
For metallic surfaces (like the engine exhaustion outlets, the guns and the nose's internal ducts), I used the Silver color without mixing with any other color.
For the dust / sand effect on the wheels, I made a mixture of White, Sand and Straw colors. I mixed with water, a toothpick, toilet paper and a small piece of old cloth for better results.
For the RLM 71 Dunkelgrün (Dark-green) to paint the top of the fuselage and the wings, I tried several mixtures of White, Silver and Green Olive to get an interesting color. To get a desaturated version, I had to add more Silver and water than the other colors. Unlike my previous mixtures I made for painting some parts of the Stuka that dried out and were discarded, my mother helped me to store the mixture for future use.
For the RLM 70 Schwarzgrün (Black-green), I used some of my mixture for the RLM 71 with a mix of Green Pine, Silver and Black, but you can use Silver, Green Pine, Green Olive and Black for an alternative mixture. I had to use more Black to get a darker shading for the German camouflage pattern on the top of the wings and fuselage.
The color paint I used for the wheels and the smoke from the engine outlets and guns was a Matte Black. Unlike the previous Black color I used for the mixtures, my brother bought the Matte Black in case he would paint on plastic surface that could work well in contrast to the colors our mother use for her canvas and small crafts.
For the port and starboard lights, I used Veronese Green for the starboard light (the right side of the aircraft / boat) and Bright Red for the port light (the left side of the aircraft / boat). I forgot to include the White color as I used it for the stern light (the rear side of the aircraft / boat).
After the Stuka, probably I'm going to prepare the Messerschmitt Bf 109 of the E series, and in the original colors from Adolf Galland's Bf 109 as his next request. In case I would print a WW2 plane for myself, I'm in between the Spitfire and the P-38 Lightning.
Well, that's it for now my friends. I hope you enjoy this Blog. In case I have some spare time to enjoy, I'll be working on other things aside from Blender projects and my personal things. Until the time comes, you will be surprised to see them. See you next time.
My DeviantArt:
My second Youtube channel:
My other Blogspot places:
My Facebook page:
My Instagram:
My ArtStation:
Note: Don't you dare to download these images and re-share it without my permission. If you do, please, leave the original author name.










Comments
Post a Comment